Difference between revisions of "Adding a Holding Tank"
m |
|||
| (5 intermediate revisions by the same user not shown) | |||
| Line 3: | Line 3: | ||
== '''Where to put the Holding Tank''' == | == '''Where to put the Holding Tank''' == | ||
| − | There is not much room in the Griffon's heads but there is a suitable locker next door in the fore-cabin. The locker is an awkward shape, so I made a cardboard tank and adjusted it to fit, then created the drawing from which the tank was made. To save anyone else going through this, here is a link to the drawing I created (please check that it will fit your Griffon, just in case....). | + | There is not much room in the Griffon's heads but there is a suitable locker next door in the fore-cabin. The locker is an awkward shape, so I made a cardboard tank and adjusted it to fit, then created the drawing from which the tank was made. To save anyone else going through this, here is a link [[File:Holding Tank.pdf]] to the drawing I created (please check that it will fit your Griffon, just in case....). |
| − | |||
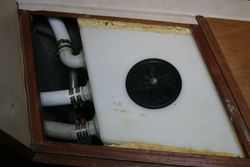
| − | [[File:Holding Tank Fixing.JPG| | + | [[File:Holding Tank Fixing.JPG|250px|thumb|center|Tank Fixed in the Locker]] |
== '''How to fit the Holding Tank''' == | == '''How to fit the Holding Tank''' == | ||
| Line 19: | Line 18: | ||
There are three pipes to the tank, the inlet, the outlet (which has an internal pickup pipe to the bottom of the tank) and the vent. The vent needs to be the same size as the other two and should have a swan-neck and a shell vent to stop water getting into it from outside. | There are three pipes to the tank, the inlet, the outlet (which has an internal pickup pipe to the bottom of the tank) and the vent. The vent needs to be the same size as the other two and should have a swan-neck and a shell vent to stop water getting into it from outside. | ||
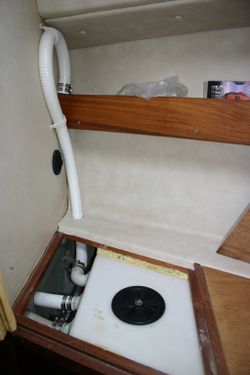
| − | [[File:Holding Tank Vent Internal.JPG| | + | [[File:Holding Tank Vent Internal.JPG|250px|thumb|center|Vent Pipe]] |
Sadly, the chrome on the external shell vent (which should face downwards and rearwards) does not last very long in a marine environment. | Sadly, the chrome on the external shell vent (which should face downwards and rearwards) does not last very long in a marine environment. | ||
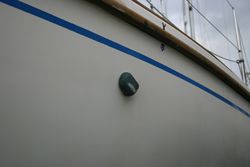
| − | [[File:External Holding Tank Vent.JPG| | + | [[File:External Holding Tank Vent.JPG|250px|thumb|center|Shell Vent]] |
I decided to connect the tank inlet directly to the outlet of the toilet pump, so the tank is always used but you could fit a pair of diverter valves so that you can discharge directly from the toilet when out at sea. | I decided to connect the tank inlet directly to the outlet of the toilet pump, so the tank is always used but you could fit a pair of diverter valves so that you can discharge directly from the toilet when out at sea. | ||
The outlet from the tank goes to a diverter valve which gives the option of emptying the tank via an on-deck pump-out or via an electric macerator pump which connects to the seacock via an anti-syphon loop which is probably unnecessary). | The outlet from the tank goes to a diverter valve which gives the option of emptying the tank via an on-deck pump-out or via an electric macerator pump which connects to the seacock via an anti-syphon loop which is probably unnecessary). | ||
| + | |||
| + | |||
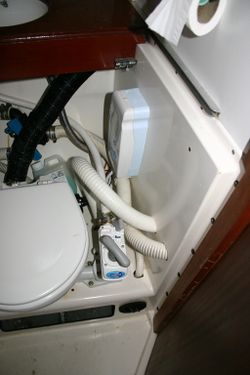
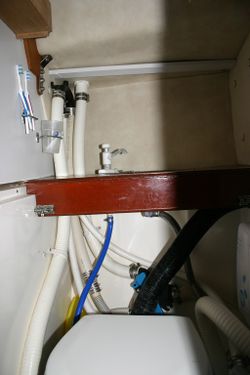
The photos show most of the plumbing. It was difficult to get a photo of the macerator pump, which is fixed to the heads floor behind the toilet. | The photos show most of the plumbing. It was difficult to get a photo of the macerator pump, which is fixed to the heads floor behind the toilet. | ||
| + | |||
| + | |||
| + | |||
| + | |||
'''Tip: Always service electric macerator pumps every 2 or 3 years, if you don't do this and the impeller blades break off, it can get very messy!''' | '''Tip: Always service electric macerator pumps every 2 or 3 years, if you don't do this and the impeller blades break off, it can get very messy!''' | ||
| − | + | ||
| + | |||
| + | |||
Richard Gunn - Griffon GN117 'Atropos' | Richard Gunn - Griffon GN117 'Atropos' | ||
| − | [[File:Holding Tank Plumbing 1.JPG| | + | |
| − | [[File:Holding Tank Plumbing 2.JPG| | + | |
| + | |||
| + | [[File:Holding Tank Plumbing 1.JPG|250px|thumb|left|Plumbing 1]] | ||
| + | [[File:Holding Tank Plumbing 2.JPG|250px|thumb|center|Plumbing 2]] | ||
| + | |||
| + | |||
| + | |||
| + | [[Maintenance, Repair and Upgrades |Back to Maintenance, Repair and Upgrades]] | ||
Latest revision as of 10:11, 10 February 2014
I added a holding tank to my 1980 Mk1 Griffon back in the winter of 1999/2000 but several owners have asked for details, so here you are.
Where to put the Holding Tank
There is not much room in the Griffon's heads but there is a suitable locker next door in the fore-cabin. The locker is an awkward shape, so I made a cardboard tank and adjusted it to fit, then created the drawing from which the tank was made. To save anyone else going through this, here is a link File:Holding Tank.pdf to the drawing I created (please check that it will fit your Griffon, just in case....).
How to fit the Holding Tank
The holding tank was manufactured from plastic to my drawing by Tek-Tanks but it could equally well be made from stainless steel.
The only way that I could think of to fix the tank in position was to use spray builder's foam, which you can buy from B&Q etc. The tank is very securely held by the foam and is still held fast after 14 years. Inevitably you get excess foam but it is fairly easily trimmed with a carving knife once it has completely set.
Plumbing the Holding Tank
There are three pipes to the tank, the inlet, the outlet (which has an internal pickup pipe to the bottom of the tank) and the vent. The vent needs to be the same size as the other two and should have a swan-neck and a shell vent to stop water getting into it from outside.
Sadly, the chrome on the external shell vent (which should face downwards and rearwards) does not last very long in a marine environment.
I decided to connect the tank inlet directly to the outlet of the toilet pump, so the tank is always used but you could fit a pair of diverter valves so that you can discharge directly from the toilet when out at sea.
The outlet from the tank goes to a diverter valve which gives the option of emptying the tank via an on-deck pump-out or via an electric macerator pump which connects to the seacock via an anti-syphon loop which is probably unnecessary).
The photos show most of the plumbing. It was difficult to get a photo of the macerator pump, which is fixed to the heads floor behind the toilet.
Tip: Always service electric macerator pumps every 2 or 3 years, if you don't do this and the impeller blades break off, it can get very messy!
Richard Gunn - Griffon GN117 'Atropos'
