Wiring
Contents
Computer Build Show
Presentation to East Coast Group Westerly Winter Workshop 2013 by Robert Jones on how to build a ruggedized PC for your Westerly [Computer Build Show]
Digital Battery Meter
An inexpensive digital voltmeter.
Wiring
Additions to 12 volt wiring on boats are often done without much thought and without sufficient care. It normally works for a time but may become unreliable.
Inspect your wiring and if the wire is old and corroded (evidence of blue powdery corrosion) replace with new wire using properly crimped connections that are heat shrink sealed and possibly of heavier gauge. If your wire is still clean uncorroded copper it should be ok especially if you clean it with emery before crimping.
Inspect contacts/connectors and terminals to make sure they are clean and not corroded.
Check for security of crimps by giving them a tug. Any that come loose must be renewed.
Any exterior or in mast wiring should use tinned wire. Inside tha cabin untinned wire will suffice.
When fault finding bypass possibly faulty wiring with a temporary twin wire, ideally fused,running direct from the battery to the load.
Original fit switches become unreliable and replacement panels with circuit braekers can be fitted to replace them.
Take time to understand you boats wiring. You may well be able to rewire it in a more logical fashion.
Fuseholders strung in the wiring are a common cause of intermittent contacts and should be replaced with securely fixed fuseholders.
Select your wire based on the table in The RCD directive referenced below.
For low current circuits the allowable voltage drop is normally the determining factor. You can calculate this based on the length of run (formula given includes there and back allowance) and the mm^2 conductor area.
For higher currents such as winches and thrusters the heating effect of the current is also detemining factor and the ampacity of the cable must be taken into account.
Rewiring and Crimping
Providing your boat has been basically dry there should be few issues with the internal wiring itself although switches and breakers can fail from contact burn and mechanical failure after a while especially if used on heavy duty circuits.
On the back of switch panels, gently flex the cable going into crimps, the insulation should still be soft. If anything looks discoloured at all or the insulation has gone brittle this can be an indication of a switch or connection going higher impedance which will cause local heating and voltage drop that will get worse. You should then replace the switch / breaker and crimp / solder terminations.
The damaged wiring can be treated 2 ways.
1. Rip the whole run out and replace.
2. If locally damaged do a staggered splice, say 2" apart, where the cable is good and use adhesive lined heatshrink on the solder spliced conductors then an overall sheaf of adhesive lined heatshrink. You may have to cut back several feet to find where capillary action of sea water had ended, before splicing in a new section.
Wire Sealing Tip: When preparing wiring to re-terminate into deck connectors, once the wires are prepared ready to reconnect put a drip of thin varnish or clear nail varnish, just where the copper comes out of the plastic, this will run down inside the insulation if positioned to allow gravity to help, capillary style, it'll dry and leave an impermeable seal that should stop future water ingress down the conductors !!
Don't skimp on wire, either the quality or the quantity and consider "Z" looming panels to allow easy maintenance and modification. If wire is correctly rated, an extra foot or so of length while looming up may pay dividends in later inspections. In marine installs, never use the red / blue / yellow part "insulated" crimps that are simple flattened by the tool (or shock horror pliers ).
Crimps
Tin plated copper crimps (such as the ones here [1] allow the grips to curls around both the bare copper and insulation and are the preferred ones to use. Make sure you use a tool that supports the curling action. You can buy moulded boots that you slide on the cable before you crimp the terminal on (along with the cable numbers that you will be using), or you can use adhesive lined heat shrink.
One of the best wiring aids on your boat will be a gas soldering iron. These support both "blow lamp" and "hot gas" nozzles, along with a "big" angled soldering bit and hot gas for heat shrinking!!.
Ideally seek to create a gas tight (therefore moisture tight) connection between the crimp terminal material and the wire to ensure good connectivity/low impedance way into the future. However to do this takes practise.
Only use crimp types for "small wiring" and choose the right size crimp to suit the cross section of cable. First crimp the terminal on the first stage only. Then use the gas iron to put the tiniest amount of solder on the exposed end, just enough to "wet" the end of the stranded cable and crimp terminal so that it is then "sealed". Practise this, the gas iron must not be too hot, only hot enough to melt the solder without instantly evaporating the cored flux, also you don't want to damage the insulation unduly, or send solder shooting along the cable, the solder shouldn't go all the way through the crimp.
Allow the terminal to cool before crimping the insulation part. in damper installs apply a blob of varnish so it's absorbed around the insulation part. When it's all dry, slide the boot of choice back over the terminal.
Important. !!
When you solder stranded copper wire it becomes stiff and a stiff wire won't absorb vibration or movement so that it may eventually fatigue and break at the point where the soldered part meets naked strands especially if it's subjected to a lot of vibration. That is why it's important to practise this technique so that minimal solder remains inside the "copper to copper" part of the crimp, and doesn't go as far as the crimp part that grips the insulation.
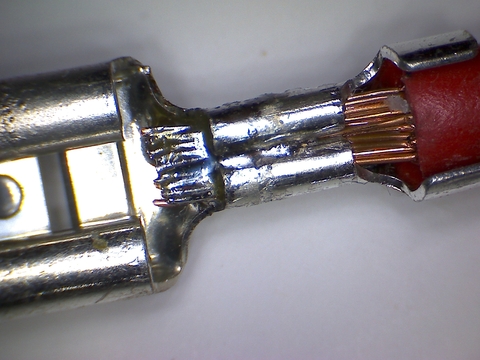
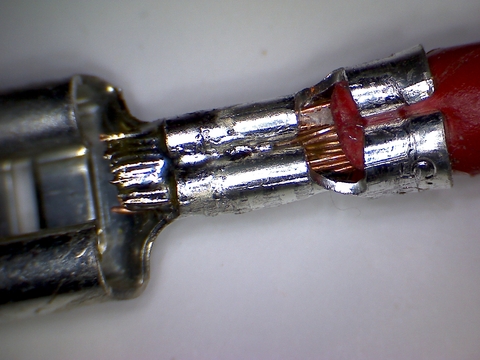
Cablecraft are a good source of material. They can supply absolutely everything you need from great quality crimps and boots, cable numbers and adhesive lined heat shrink. The picture below illustrate the soldering technique. Plain stranded copper 2.5mm, has been used however by preference on a boat use the more expensive tinned copper wire. Using plain copper here shows where the solder stopped.
This method will however ensure that even plain copper will not corrode in the important contact area, and will always carry maximum current without creating a local hotspot as it cannot go high Z due to corrosion between wire and terminal.
To show clearly the solder flow the joint pictured has too much of the copper bared. Normally there would be negligible copper between copper fold in and sleeve and only 1/2 - 1 mm of the copper showing on the side soldered. The solder was applied with an electric temperature controlled iron set at 320c, and it was applied to the copper wire and crimp together. Note the solder has only flowed about 1/2 the length of the folded in crimp.
The insulation grip has now been closed, note the insulation should have been almost touching the copper folder in crimped section, but as previously explained, it was done this way deliberately inorder to show that the solder hasn't been allowed to flow very far.
Next add a drop of thin varnish or clear nail top coat to the start of the insulation, so that capillary action draws down the liquid before it dries and creates a seal to the rest of the cable. The plastic boot simply pulls down over the connector insulating electrically the whole terminal externally. Alternatively you can use a piece of clear adhesive lined heat shrink sieving, about 5mm longer than the actual crimp which totally covers the crimp opening .. just like the boot would. If you use longer lengths of separate adhesive lined heat shrink. You can also print off labels for your cables on an ink jet or laser printer and slide these under the heat shrink before sealing it all up. Never twist wires, when putting a crimp on. With both the crushing type of crimp and the better fold in variety the strands need to be running straight to be compacted properly within the crimp. In the crushed down type crimp this is essential, so that the strands can move from their original circular shape to conform to the new more "oval / elliptical" profile of the crimped terminal.
Cablecraft.co.uk do 9/3mm 3:1 adhesive lined clear heat shrink or Farnell and RS both do 4:1 adhesive lined.
For 1/4" terminals use 8/2 heat shrink.
Resources
Sources of tinned wire and crimps are here:
RS (click the "similar products" tab to see that range )
Sources of switch panels and breakers are here:Boat Electricals
References
Information on metric wire sizes based on the Recreational Craft Directive here: RCD Wiring Standards
More on crimping here:[2]

