HOW TO GET THE BEST OUT OF YOUR WESTERLY
Transcribed by Mike Smith on 01/10/01 from the original manual produced by:
WESTERLY MARINE CONSTRUCTION LIMITED DESIGNERS AND BUILDERS OF FINE CRAFT
HAMBLEDON ROAD, WATERLOOVILLE, HAMPSHIRE
INTRODUCTION TO YOUR WESTERLY
The length of this booklet would be altogether too great if we were to mention every part of the boat. We are, therefore, only commenting on those points which were raised by individual owners during the first year's sailing. Our answers to these should, we feel, cover most owners' requirements. If, however, you have any particular query please do not hesitate to write to us. This treatise is not supplied to save ourselves work. It is to help you get the most pleasure out of your boat.
D. A. Rayner. A.R.I.N.A.
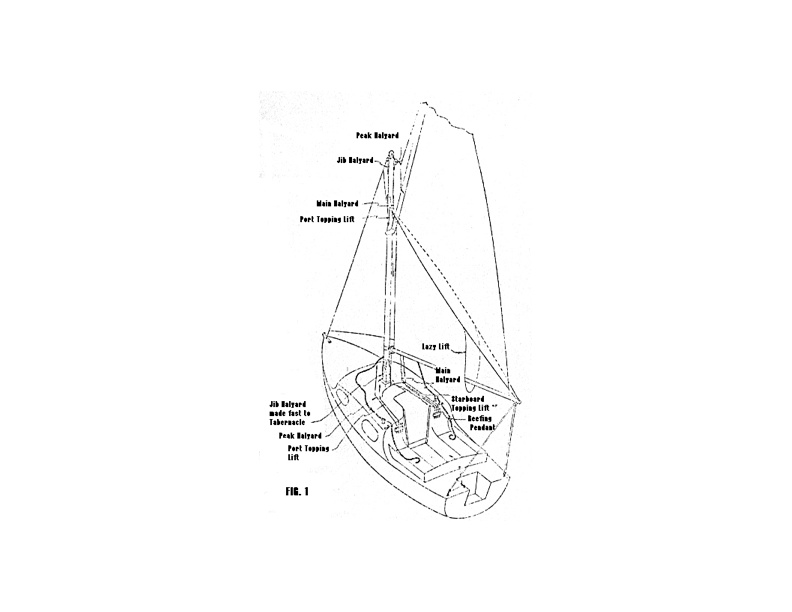

Fig. 1 shows the running rigging of the gunter boat: that of the Bermudan is self evident and, as the boats are packed for delivery, should present no difficulty even if circumstances have prevented our driver rigging the boat for you. Rigging of the gunter boat is fully set out in the diagram, but note that it is easier to operate the reefing gear if the main halyard is brought aft to the pin on the same side as the line which works the reefing gear.


Fig. 2 shows the correct method by which to lace the luff of the gunter mainsail to the mast. When the lacing is done this way it will never hold up the sail when it is being reefed or lowered. Note that the lacing should not draw the sail closer to the mast than a straight line between the tack and throat fastenings.
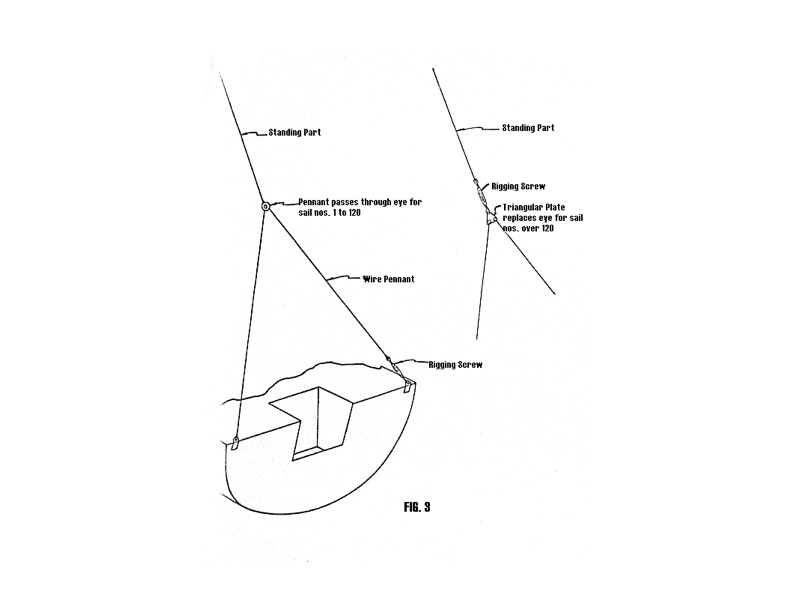

Fig. 3 shows the split backstay of the Bermudan Westerly 22. A wire pennant leads through an eye at the end of the standing part and is set up by a rigging screw; the other end being shackled to the opposite backstay plate on the transom. This method was used up to sail No. 120. Later sail numbers have the new triangular plate with the bottle screw above it.
HOISTING THE GUNTER SAIL
To hoist the gunter mainsail, first raise the yards from the crutch by taking the weight equally on both topping lifts, then insert the battens and see that all clears of the mainsail.
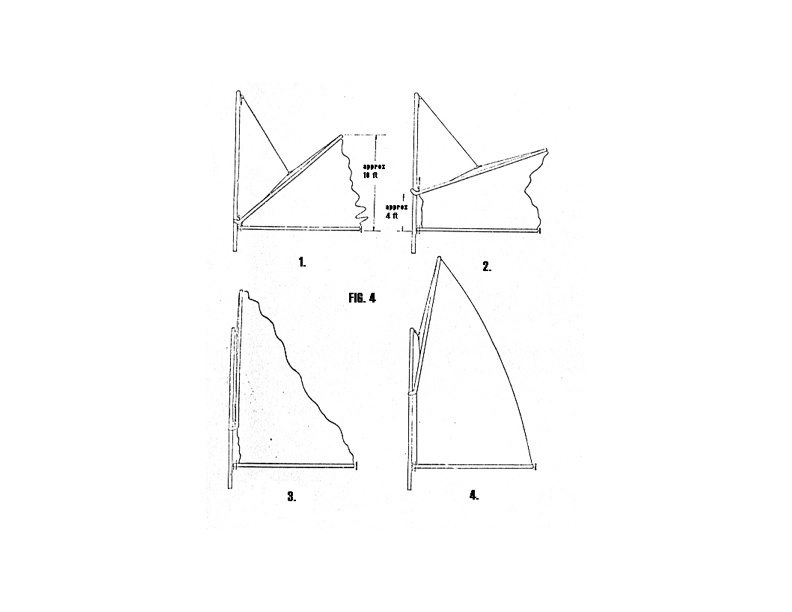

Diagram 1 Raise the peak halyard until the outer end of the yard is about 10 foot above the end of the boom.
Diagram 2 Raise the main halyard until the gaff jaws are about 4 foot above the forward end of the boom.
Diagram 3 Hoist the peak halyard fully up so that the yard lies closely against the mast. You may now coil up and belay the peak halyard because all the remainder of the hoisting is done with the main halyard.
Diagram 4 Hoist the throat halyard fully up, coil and belay. When the sail is set release the topping lifts so that they do not crease the sail when it is full of wind. To lower the sail, reverse the process described in the diagrams after first setting up both topping lifts to an equal degree of tautness. When lowering the sail the gaff jaws should be lowered to the boom before the yard is allowed to come between the twin topping lifts. The purpose of the lazy lift is to collect the sail as the yard is lowered. Note from the diagrams that, both when raising and lowering the sail, the top of the yard should always be higher than the gaff jaws.
Reefing a Bermudan Boat The mainsail of a Bermudan boat is reefed with a worm gear of Tufnol. It is best to take the weight of the boom on the topping lift before reefing. The gear can either be operated from the deck or by standing in the opened forehatch.
Reefing a Gunter Boat The gunter mainsail has two topping lifts and, when reefing or unreefing, the weight of the boom is taken on the weather lift allowing the yard as it is lowered to remain unencumbered by the leeward lift. The gunter mainsail can be reefed quite simply. When the weight of the boom has been taken on the weather lift the throat halyard is lowered at the same time as the reefing line is pulled. The reefing line rotates the drum and the drum turns the boom. When sufficient rolls have been turned in, the reefing line is made fast to the pin rail and the throat halyard is set up again. Lastly, note that the weather lift should be eased to its sailing position. The peak halyard need not be touched until the last seven or eight rolls have been taken in the mainsail: the yard being held to the masthead by the wire gaff span and its traveller. When this traveller reaches the top of the span then both halyards must be eased off to lower the sail for the last two turns.
In fine, settled weather the lacing which holds the luff of the mainsail to the mast can be carried down to the lowest hole in the sail. Obviously the lower turns must be undone before the sail can be rolled up on the boom. So in normal weather “ generally when making a passage“ we recommend that the two lower eyelets are not laced to the mast. This allows of three or four rolls being taken in before it is necessary to undo more lacing. We ourselves always try to keep at least two eyelets above the rolled boom free of lacing so that the sail is always ready for another deep reef if of a sudden necessity should arise. For general sailing it will be found that the power of the throat halyard is quite sufficient to keep the luff taut even when the two lower eyelets are not laced.
Heaving-To Your Westerly can be made to heave-to and left to look after herself while you cook a meal, put on your oilskins or make an adjustment to your gear. The fact is most important because many people will find it most simple to reef the mainsail in the hove-to position. Westerly lies so steadily that you need have no fear of changing tacks if you need to go forward. Heaving-to is normally achieved by hauling the weather jib sheet until the clew of the forward sail is well to windward of the mast. Alternatively the lee jib sheet is eased until the clew of the jib is close to the forward lower shroud and the boat is then put about. What was previously the lee jib sheet will now become the weather jib sheet, the jib will be hauled to weather and mainsail will balance on the new tack.
When hove-to the tiller should not be lashed. It will be found best to raise the tiller upright to give more room in the cockpit and to leave the rudder free to move. After perhaps a minute of weather cocking your boat will settle peacefully in the hove-to position. If she fore-reaches too fast and seems too pressed the mainsail can be eased out a little. Otherwise there is nothing to it she will lie for hours.
Storm Rig
With the gunter boat it is possible to make a very efficient trysail rig by using No. 1 jib set aft of the mast with its luff laced to the mast; the lacing being through the piston hanks. The tack of the sail is shackled to the eye in the side of the tabernacle base. The head is hoisted on the peak halyard. This rig is well balanced with the No.2 jib and under this rig the ship handles very well and tacks with certainty in winds of full gale strength. More than one sailor has proved this at sea.
Before setting the No. 1 jib it is necessary to prepare the mast, boom and yard above it. First lower the mainsail and furl the sail as for harbour stowage. Lower the topping lifts until the boom and yard are resting on the weather side cabin top. The spars are then lashed down securely to the pin rail on that side. The topping lifts, if they are not to interfere with the trysail, must then be triced forward to the deck blocks through which they normally pass. With the spars securely lashed, the mainsheet block can be unshackled from the boom end. The mainsheet will then be ready to use as a trysail sheet, the block being shackled to the clew of the No.1 jib before the sail is hoisted. As it is not practicable to lace the sail above the sheave in the mast which carries the main halyard, the lacing should be started from the second piston hank below the head cringle.
This rig should see you through force 8 to rising 9. Beyond this it is probably a question of making a down wind course for some harbour under the No.2 jib or bare poles, or if sea room is available, just letting her lie a-hull with or without a sea-anchor. In any event above force 9 all the storm doors should be shipped, the main hatch shut and anyone in the cockpit properly harnessed to the lifelines. If any attempt at a down wind passage is made warps should be towed astern. Five fathom of 4in. grass warp is best. If not, then a bundle of anything made fast to the Terylene kedge warp – and, in any case, watch for chafe in the after fairlead. To end on a more cheerful note – on of Westerly's ancestors survived a force 11 gale in the Minches.
A Bermudan boat cannot so easily fabricate an emergency trysail but she too can do so if a little forethought has been given to the matter. The sails to use are the No. 3 jib forward of the mast and the No. 2 jib aft of the mast. All that is required is a sufficient number of spare track slides and some easy method of fixing these to the piston hanks of the No. 2 jib. In default of any other method they can be lashed on with spun yarn. And, if you were engaged in a serious passage, could have been so lashed before the weather worsened.
THE SAILS
The Set of the Sails The mainsails are sent out bent on to their spars. There is little or no stretch in Terylene sailcloth and the sails do not need “stretching†as did the old fashioned sails of cotton, nor need the lanyards which haul them out on the spars be released at the end of each day's sail.
The set of the mainsail and its shape can be varied in more ways than one. Sails are not flat surfaces but are very carefully cut to have a certain curve (or draft) in the surface. A sail should be hauled out hand taut on the spar and, when full of wind, hoisted so that it is free from creases. The curve of the mainsail of the gunter boat is capable of being varied considerably by the tension applied to the lacing which holds the luff to the mast. In hard winds the sail will develop more drive if the "draft is reduced by tightening the lacing while in light weather the sail will drive the boat better if the lacing is slackened and the draft increased. At the after edge of the sail (the leach) its shape is controlled by the leach line. This is a thin cord running down the hem. It should be adjusted on a fine day of light wind and should be only just tight enough to prevent the outer edge of the sail from fluttering. If it is too tight it draws the trailing edge of the sail into a bag which will hold back the boat's progress. Once set it will need little attention. Care of the Sails Terylene sails when wet may be left bent on the boom and neatly stowed without damage as long as they are open to the air and can breathe. Sails which need to be stowed below should never be rolled up and stowed away when they are wet. Terylene sails dry very quickly and the cushions are of waterproof material. If you have to leave a wet sail below decks see that it is well shaken out and loosely piled across the forward berths.
It is often said that Terylene will not mildew. Maybe not; but mildew is a fungus which grows on dust and in most cases there will be some dust or dirt in the interstices of the weave. At the end of the season and before stowing the sails for the winter make sure that they are thoroughly washed and well rinsed before being dried and stowed away in their bags in a dry and cool store.
Unless there is much dirt in the atmosphere Terylene sails are probably better without a sail cover. But if one is used then it should be of the same cloth as the sails and put only for the purposes of keeping them clean and not for protection from the rain. Sailcoats of waterproof cloth (particularly the P.V.C. covered materials) sweat badly and Terylene, which does not mind rainwater and air, does hate condensation within a closed atmosphere.
Sheet Leads In the Westerly 22 gunter rigged boat the sheet leads of the No. 1 jib are best led outside the fore lower shroud and inside the after lower shroud. With the No. 2 jib they should be led inside both shrouds.
In the Bermudan boat with the No.1 jib the sheets should be led outside the fore lower shroud, inside the main topmast shroud and outside the after lower shroud. With the No.2 jib and No.3 jib they should lead inside all shrouds.
ADJUSTING THE TRIM
Your sailing yacht trim must be considered to be in two parts. One sort of trim refers to the way the hull floats in the water and the other to the positions of the surface area of the sails relative to the hull. In practice both variants are at work at the same time, sometimes to give the same effect and at other times working in contradiction.
It is astonishing by how much trim can be altered and performance ruined by incorrect loading or the wrong choice of sail. The weight of your Westerly's hull is close to 27 cwt. In addition you may well have five people aboard with an average weight of 160 lbs. – a total of 7 cwt., and it is by no means uncommon for your ship to be carrying a further 5 cwt. of personal gear, food, water and general stores. This means that beyond the ship's 27 cwt. there may well be a further 12 cwt. whose disposal along the fore and aft axis of the boat is completely beyond the ability of the designer to control. Expressed as a percentage of the total sailing displacement of 39 cwt. we see that 30% of this weight (quite a large proportion) can be carried in any position chosen by the owner. A ship so laden might come across another Westerly at sea which had perhaps only two people aboard carrying only 2 cwt. of stores – say a total sailing displacement of 32 cwt. Both owners will expect an equal performance although one ship now weighs 22% more than the other.
Your waterline (the lower edge of the boot top) is the designed level. Your stowage of weights should be arranged to keep it so. This question of trim is so important that it might well be that a correctly trimmed Westerly weighing 39 cwt. could sail past an incorrectly trimmed boat 20% lighter, even when both boats were carrying the same sail.
A designer, when considering the position of his ballast, has to start from some premise or else his calculations can have no relation to fact. Westerlys are designed to carry three people in the cockpit and 200 lbs. Of engine, fuel and calor gas aft of the rudder head and 60 lbs. of dinghy under the cockpit floor – a total of 740 lbs. It will be seen, therefore, that another ship sailing with two people, no gas bottles, no dinghy, a lightweight Seagull engine and only a two gallon tin of petrol in the after locker is going to be woefully trimmed by the bow and is, therefore, very likely to develop weather helm; for instead of having 740 lbs. aft of the cabin bulkhead she will be carrying only 373 lbs.
An owner must decide for himself what his normal weights are going to be and make the necessary adjustment himself. In the case of the “light†boat postulated above, 1 cwt. of ballast stowed abaft the rudder post on the ship's skin should greatly improve performance. Alternatively water in collapsible polythene containers can be a very useful method of adjusting trim and has the advantage of being easily shifted, emptied or even drunk in an emergency.
It must be remembered too that trim in the fore and aft line can affect that other part of the big problem of balance – the position of the sail plan relative to the hull. When the factual waterline is varied 2 degrees from the designed waterline the masthead is moved as much as 12 inches forward or aft – forward when the ship is trimmed by the head, aft when she is down by the stern. To move the masthead forward reduces weather helm while a masthead trimmed aft increases it. It will be seen, therefore, that the effect of weight in the stern which tends to reduce weather helm (unless the weight is very excessive when it can increase it because of the drag-wave engendered) will in some measure increase this effect by bringing the masthead aft. It will, however, be found in practice that the effect of shifting weights forward or aft is always greater than the effect achieved by changing the angle of the mast, although it may be useful at times to adjust the mast's rake when once the weights are fixed.
The mast of the Westerly is designed to be upright when the boat is carrying her normal crew and when trimmed parallel to her designed waterline. This means that when the crew is gathered in the cabin, or when the crew is out of the boat and the boat is moored by a heavy chain the mast may “appear†to be raked slightly forward. Remember that an owner rarely sees his own boat under sail!
Excessive weather helm – that most annoying and tiring attribute of shoal draft boats – should never be allowed to spoil the enjoyment of sailing a Westerly. Some degree of weather helm is an essential part of the designed safety built into a boat, for only by easing the tiller and letting her “bight†can a boat of this size climb the face of a really big wave. On the other hand excessive and tiring weather helm should always be preventable and it can be controlled. But before we can see how to do so we must understand the causes which induce it. Imagine conditions of a steady force 4 wind and smooth water and assume that, with full mainsail and No. 1 jib, your boat is set on a course to bring the wind abeam. If the jib sheet is loosed until the jib flogs in the wind the ship will, in fact, be sailing under the main only. Under these conditions she will be moving slowly and steadily under the one sail abaft the mast and the tiller will be light. If the jib is now sheeted in slowly it will be noticed that as soon as the jib starts to hold any wind at all the speed at once increases, and will go on increasing as the jib is brought to its correct position for the course. At the same time the helm will have become heavier to hold – a phenomenon which has been created by giving her more sail before the mast. From this we see that the onset of weather helm is not entirely dependent on the position of the sails relative to the mast. We have to consider what else has happened. With the ship sailing faster she is also healed a great deal more under the two sails than she was under the main only. Angle of heel and speed can together produce the effect of weather helm and of these two the first sets up by far the most powerful forces. Under full sail in a force 4 wind she will be carrying too much canvas and a reduction will be advisable – probably four rolls will be sufficient. By so doing we reduce the angle of heel, reduce the area of sail aft of the mast relative to the foresail and make little, if any, effect on the ship's real speed through the water, although (because she is less pressed) it may appear to the helmsman that the boat is not going as fast as she was.
There is a tendency amongst many helmsmen when in sheltered waters and when the surface is comparatively calm to carry too much sail and thus actually reduce their boat's optimum performance. At sea and in the same wind force the wave motion would have been sufficient by itself to have forced the crew to ease the ship by reefing to a proper area of sail.
Your Westerly will go best and without excessive helm if you do not sail heeled beyond the point where the lower rubbing strake is just lapping the water. And if yours is a gunter rigged boat, do not think of changing from the No. 1 jib to the No.2 jib until you have at least six rolls in the mainsail. With the Bermudan rigged boat the sequence of sail change is a little different. The first reduction to sail area is made by changing the No.1 jib (almost a genoa) for the No.2. Then after she will carry the No.2 with a progressively reefed mainsail until the wind (depending on the sea running) is somewhere between force 6 and 7. The No.3 jib of the Bermudan rig and the No.2 jib of the gunter should both be regarded as storm sails – carried by sensible sailors but, one hopes, rarely used. We cannot quite close the question of trim without considering the action of the rudder. Perhaps the largest single design compromise of shoal draft craft is that in opting for shoal draft, the advantage of a rudder going deep into the water must necessarily be lost. As a seaworthy small vessel is heeled the hull will rise bodily in the water. This movement allied to the angle of heel brings much of the rudder out of the hard water which is down below into the turbulent water of the ship's own passage. In fact one only has to think of a class dinghy pinned down by a squall to remember that excessive heel reduces the efficiency of the rudder, and here again this effect is more noticeable in still water when the angle of heel is steady than when the angle of heel is made irregular by wave motion. Then, when the waves throw the boat against the wind, the rudder becomes more nearly vertical and can do its work much better.
Oddly enough it is not the rudder which actually alters the direction of the boat's travel. The rudder is no more than a trim-tab applied to the whole hull of the boat and its keels. The turning motion comes from the forward travel of the hull being applied obliquely to the water, the initial twist having been given by the application of the trim-tab – or rudder. It follows, therefore, that the helm need not be continuously applied. In fact the rudder's effect is much greater if it is applied momentarily and only when it is required. To clamp the tiller with a continuous grip is to nullify its effect because then the “tab†is fixed and becomes merged with the hull which it should be controlling. Theoretically, the rudder should be applied and then eased as soon as its work has been achieved ready for the next application of helm. In practice a good helmsman will have applied his rudder before the need for it is apparent to a man of less skill. If rudder is applied early a small angle will be needed to achieve a given effect – and for a shorter time. An increase in wind strength should be seen and felt instinctively by the helmsman before its effect of increasing the heel of the ship can be noticed. To apply continuous rudder is not only extremely tiring but it slows the ship and can lead to a condition where the helmsman is locked to his tiller in a perpetual and passionate embrace!
THE TRAILER
The trailer supplied by us has been made as waterproof as possible. But unless it were to be made entirely of non-ferrous metal – and that means all of it, brake linings as well – it must be given regular servicing after each time it has been in the water. The wheel bearings are packed with grease and need to be kept so, as must the over-run brake actuating cylinder. The brakes themselves are perhaps the most vulnerable. After each submersion drums should be removed and the brake mechanism greased and checked to be in working order. Similarly the hitch releasing cam and the locking pin which holds the hitch fast need regular greasing.
SOME GENERAL NOTES ON FITTING
Gas Feed Because we believe that an endless flexible tube is the best and safest method we fit a neoprene low pressure calor gas tube from the reducing valve to the cooker. Small bore copper tube and brass connectors may seem to be a little more gas-proof, but the copper can become brittle in sea air, and vibration or movement can disturb the connectors or fracture the pipe. We recommend that irrespective of the actual condition of the neoprene pipe it should be renewed at two yearly intervals. It is very cheap, about 1/- per foot. Note that rubber tube (or any tube not recommended by the Calor Gas Company) can be dangerous.
Sea Cocks in General and the Lavatory in particular Bronze seacocks of adequate size are fitted to all skin fittings. Those of the cockpit and the sink waste are normally left open. They are fitted only as a precaution against accidental damage to the pipe they serve. The seacocks for the lavatory are a very different matter. They should be shut off on every occasion that the machine has been used. The lavatory valve is supposedly safe, but anything foul of the seating could cause a slow leak which would not be cured until the machine was used again. It is better to be sure than sorry. And, while on the subject of lavatories, please remember that absolutely nothing but proper toilet paper should be used – and certainly not water resistant cleaning tissues. These hang up on the valve and cause it both to leak and function at low efficiency. Again please remember that sea water itself is sufficiently antiseptic – the use of strong cleansing compounds will not only ruin the valve but also clog the machinery. At the end of the season the interior of the bowl may be cleaned with bleach (soaking a pad at the end of a stick) and then washed through with a fresh water rinse.
Stainless Steel Deck Fittings and Shroud Plates We only use the standard EN58J quality steel and Argon arc welding but while this is proof against corrosion from attack by sea water there will be, after several months, a chance of light staining. Amongst some yachtsmen there is a tendency to think that modern products relieve the owner of taking any care of his ship at all. In some ways this expectation may be true. On the other hand, if the boat is to be kept looking really smart, some minimum effort is still required. The fittings should be rubbed as and when they become stained with a pad of soft rag, wet with fresh water, on whose surface a little Vim has been sprinkled. Better still, staining can be prevented if you will wipe over all stainless fittings with silicon grease or a lanoline preparation.
Tufnol Snubbing Winches The tolerance between the drum and shaft is necessarily very small. The slightest corrosion on the shaft or sweating of the Tufnol may cause the winch to bind. If this happens the big set-screw on top should be removed, the winch barrel withdrawn and the shaft greased with waterproof grease before the barrel is replaced. Once this has been done the winch is unlikely to call for further treatment for a year or two. SECURING FITTINGS TO GLASS FIBRE
Quite a large are of the interior is wood and to these fittings such as barometers, clocks and the holder for a hand bearing compass can easily be fixed by normal methods. Otherwise the securing of fittings to glassfibre falls into two categories.
Deck fittings These can only be secured by bolts passing through the glassfibre structure. Glassfibre is easily drilled with an ordinary metal drill. The fittings should be set down on a bed of grey or black mastic (in general yellow mastic loses its resilience in the presence of sea water and becomes brittle after a few years). A pad of solid hardwood or metal should always be fitted on the underside to make a big washer. If the correct mastic has been used leaks will not occur and the nuts can always be tightened up if required.
Internal fittings These too can be bolted through the glassfibre laminate if the nuts on the other side are not going to be unsightly. As internal fixtures are not likely to have to take the same strain on the bolts as that which deck fittings will exert there may be no need to fit a backing plate. Alternatively a very good fixing can be made by sticking a pad of wood to the glassfibre and then screwing to the wood. To do this first thoroughly rub down the area where the pad is to stick until all the surface paint has been removed. Ideally this should be carried to the extent where the tiny white fibres of the laminate can be seen. The pad of wood is then stuck to the area with Araldite glue and securely held there by pressure until the glue has thoroughly set. If the pad is in such a position that it cannot be held with clamps it should be wedged into position. Under laboratory conditions a very great degree of adhesion can be obtained, the figure running into thousands of pounds per square inch. In practice it may be difficult to reach perfection because the wood pad may not absolutely fit the place to which you are trying to stick it. None the less even a very amateur workman should easily achieve a degree of stick where his fixing will support a hundredweight – and you are not very likely to need to fix supports or weights in excess of that figure.
THE ENGINE
The maintenance of the engine should be fully covered in the manual issued by its manufacturer. All we ask is that you comply with what it asks. From experience we find that it really is necessary to keep the plug gap at the recommended setting. In this connection the gap advised by some manufacturers differs greatly from that recommended by others. It is a mistake to consider that because one outboard engine runs best at one setting al others require the same. Even more important is the fact that not all outboard engines use the same petrol-oil mixture and none use the two stroke mixture sold for motor cycles. The correct petrol mixture is absolutely critical for the successful operating of an outboard. The recommended amounts are frequently in proportions for which the local garage has no measuring equipment – say one third of a pint of self-mixing oil to a gallon of petrol, and the local garage hand often tends – in an effort to avoid appearing niggardly – to overfill the measure unless he is carefully watched. He is quite capable of giving you half instead of one third of a pint. We never allow any garage hand to put any oil into any of our cans. We carry in the car a glass milk bottle marked in one third pints. On the only two occasions in the last four years when my outboard has oiled a plug it has been because the rule has been broken by circumstances beyond my control.
Where an outboard has an enclosed engine casing it is a mistake to shield the head with any additional cover. The engine will keep in much better condition if it is allowed to breathe. A polythene bag should never be used, for under this condensation will do more damage than under any other material.
Unless it is use the engine should not be left with its propeller and shaft in the water. Galvanic action will set up between the engine and the ship's own rudder, or the fittings of nearby boats. It is true that the modern engines are built of corrosion resistant alloys – but they only resist corrosion, they cannot entirely prevent it.
The tilt mechanism should be tightened so that the engine will readily stay in the raised position. Even so, when the ship is left on her moorings, it is a wise precaution to pass a line round the engine head and secure it either to the after cleat or to the rudder head.
Fuel Here again it is a mistake to be extravagant. Outboards will only give satisfactory service if they are run on commercial grades of petrol. High octane fuel always causes trouble – and they do it sooner rather than later. We find that the best method of filling the main tank from the reserve cans is to have a four foot length of polythene pipe into which one end of a polythene funnel (one with a filter fitted) can be inserted. Using this, the petrol tank can be replenished even in a big sea.
SOME REMARKS ON POSSIBLE REPAIRS
Normally speaking the only repair that need be envisaged in the early years of a boat's life is to the rudder, which is always rather the Achilles Heel of any craft. We have designed our boats so that the rudder is very easily removed for servicing. When the rudder head has been unbolted and removed, the boat (standing on hard ground) is tipped forward on her keels until the stem touches the ground. In this position blocks of wood are placed under the after ends of the keels to prevent her falling back. The three bolts holding the plate at the end of the skeg are then withdrawn. This plate carries the lower rudder pintle and as soon as it is removed, the rudder can be withdrawn. The rudder is replaced by reversing the process.
The only other foreseeable repair would be the need to replace one or more of the bolts securing the keels and skeg in boats prior to Sail No.118. To remove these bolts the glassfibre laminate covering the bolts should be cut round with a cold chisel or ground off with an abrasive disk. The nut can then be removed in the normal way, the old bolt driven out, its replacement inserted, packed well with black mastic and the finished job matted over with fresh laminate. In all boats after Sail No.118 the skeg is glass fibre and the keel weights are bolted to the keel stubs with stainless steel bolts. These are very unlikely to need replacement in the sailing life of most owners as they have a very reasonable expectation of at least fifty year's service. But, in the unlikely event of very severe damage it should be noted that there is a neoprene O ring washer in a countersink between the cast iron keel and the glassfibre laminate of the keel stub. This would have to be replaced as it would undoubtedly have been damaged by the removal of the bolt. It will, therefore, be best to release all the bolts on that keel and fit a fresh set of washers and rebolt.
Repairing Severe Damage to Fibre Glass Owing to the enormous strength and the slight elasticity of glass fibre built to Lloyd's Certificate penetration of the hull is a most unlikely occurrence. If it should happen emergency repair is quite simple. Most yacht yards and many garages are quite capable of effecting a seaworthy job. Normally only two essentials are required – a temperature above 55 degrees Fahrenheit while the resinated matt is setting and a dry surface on which to place the patch. A tip worth knowing is that if there is any chance of the damaged are being damp it can easily be dried off with the flame of a blowlamp.
Resurfacing Small Scratches So long as the gel (or outer coat of pure resin) has not been punctured minor scratches and abrasions can be removed by using a compounding paste (sold by all garages) and burnishing the affected area with a high speed polishing disc fitted in the chuck of an electric drill. These pads are stocked by nearly all tool merchants.
If the gel coat has been punctured so that the glass fibre laminate is exposed the damaged area should be filled with polyester putty pigmented to match the hull colour. There are several brands on the market obtainable from garages. When the filler has hardened any surplus should be rubbed down smooth to the hull first with wet and dry 180 paper and then with wet and dry 400 paper to finish off. It may then be burnished with compounding paste as described in the previous paragraph. If the work has been well done the old wound will be invisible.
FRIENDLY RELATIONS
From your experience of us we hope you will have given us credit for doing our utmost to build you a good and trustworthy ship. Now it is our turn to ask you to be a good customer. Experience has taught us that the most delicate part of the transaction between customer and builder is that moment when the boat changes hands. In most cases this is a very happy occasion but just occasionally it can go wrong.
We ask you, therefore, to try to look after these few points:
(1) Either be there to meet the boat yourself or appoint a really responsible agent who is empowered to check over the gear and to sign the receipt for the boat. She is yours the moment she is unloaded from our trailer or, if you are buying a trailer, from the moment your trailer is unhitched from the towing vehicle.
(2) As we can have no certainty that the boat is insured and we do not wish to have to insist on customers giving us a sight of their insurance papers, we do ask you to give our driver a cheque in settlement of the final account before he leaves, or else to see that a cheque has already been posted to us before delivery is accepted.
(3) Please give our driver every reasonable facility to rig the boat – if that is your desire.
Finally may we recount the result of our investigations into some delivery “mishaps†which speak for themselves.
Complaint Your driver left me to rig the boat myself.
Investigation Our driver put the boat into the water at 7.0pm. The owner, delighted with his new boat, went off to sea under engine before the mast was raised without telling our driver what he was doing or giving him any idea of when he would return. As the boat had been launched oveeer 200 miles from the factory there was no knowing when the owner would be back our driver hitched up his trailer and left for home.
Complaint The manager at the ….. Boatyard tells me that your man left no papers for me nor have I yet received the Lloyd's Certificate.
Investigation Both envelopes were eventually found under a pile of correspondence in their Yard Manager's office. Admittedly it would have been better had the invoice been sent by post. But just occasionally – as in this case – the boat had been delayed by last minute alterations and we had been unable to complete the invoice in time for it to be posted.
Complaint The Yard Foreman at …. Tells me that your driver refused to rig the boat.
Investigation Our driver said that the yard foreman told him that he “…. well knew how to rig any …. Boat and didn't want any …. Help from himâ€.
Well, of course, there will always be two sides to every question – as we ourselves are the first to admit.
May we wish you the best of luck with your ship and many very happy hours aboard her.
WESTERLY MARINE CONSTRUCTION LIMITED