Replacing the diesel tank
The problem
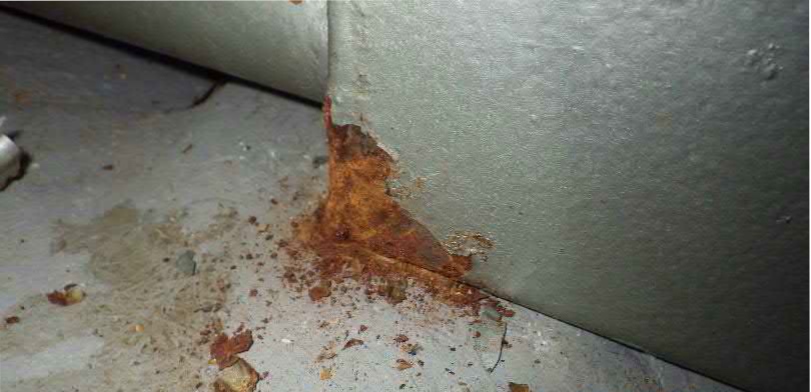
When we had a pre-purchase survey done for our 1988 Konsort pepperbird (then Periplus) at the beginning of 2020, we were informed, among other things, of the rusting corner of the diesel tank: "Recommendation: It is Recommended that the corrosion at the starboard side aft lower corner of the fuel tank be cleaned of corrosion material and painted".
Various considerations
Despite Corona, we managed to bring the boat to the Netherlands the same year - it absolutely had to be imported into the EU before Brexit came into force. It wasn't until the next summer that I was able to take care of the rusting corner. According to an expert friend, the problem did not seem too urgent. There was still enough material left from the sheet metal, so a repair of this one spot according to the surveyor's idea would be quite possible. But! - We only see this one corner and therefore do not know what the rest of the tank looks like and what we know even less: Are there any spots inside that have already been more affected by rust due to water at the bottom of the tank, for example. Around this time, I read about a Fulmar whose tank had rusted through from the inside out. That would be the worst-case scenario! The only way to find out how badly the tank was rusted was to remove it and take it to Austria for as closer examination, because I could still only spend a few weeks' holiday with my boat in the Netherlands. To be prepared for all eventualities, I started to get estimates from various locksmiths. The sketch I found on the Westerly Wiki pages was very helpful (Konsort_Fuel_Tank). The answers were sobering: between €1,500.00 and €1,800.00 including VAT for a stainless-steel replica.
I then looked around for replacement tanks that are either plastic or steel. There are various models on the market, but none seem to fit exactly where the old one was. The ones that weren't too high were generally much too small. And with a tank in a different place, we would have to relocate all the diesel hoses. That would cause a lot of extra costs in terms of time and money.
The way out was found when I talked to Peter, my brother-in-law, who is a trained mechanic (even though he only does this job as a "hobby"), about the matter. He has an acquaintance in his area who does stainless steel work as also a "hobby", and he wanted to talk to him about whether he could make such a tank. He said I shouldn't worry about the price; the guy owed him and would do it for him cheaply. Although I didn't want to order something I didn't know the price of, this seemed to me to be the most sustainable and, all in all, the cheapest solution, even though I kept thinking that the easiest thing to do would be to sand off the rust thoroughly, treat the metal with rust converter and then paint it, in other words, to follow the surveyor's recommendation exactly. But then I remembered the tank of the Fulmar, which had rusted through from the inside...
The solution
So, at the end of our 2021 autumn cruise, the time had come: after craning, we emptied the remaining diesel as much as possible with a hose pump and then Matthias climbed into the cockpit locker. In no time at all he had loosened all the pipes from the tank and removed all three fastening bolts. Now we could push the container forward and with a little turning and pushing it was lifted out into the cockpit. When we tried to empty the diesel sump, we unfortunately broke off the seized valve. We then rinsed the whole thing out, disposed of all the contaminated liquids accordingly and then packed the tank in lots of plastic foil to make it odour-proof and transported it to in-law Peter's in Upper Austria.
The execution
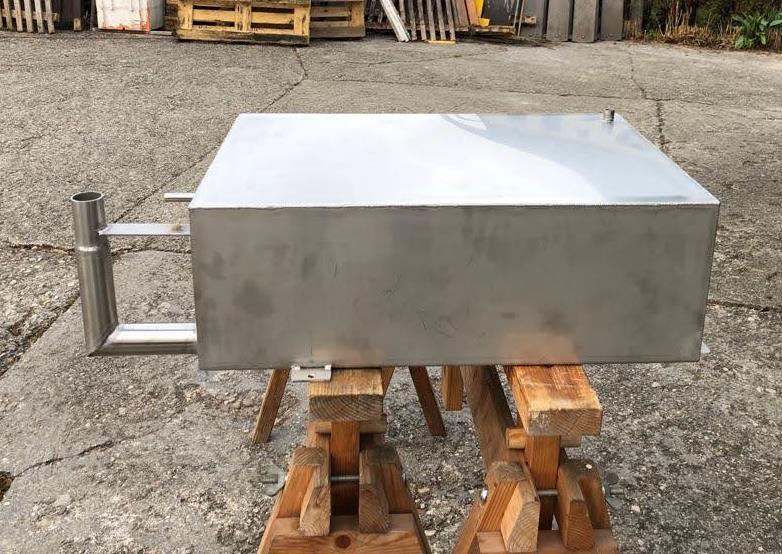
Over the following winter, the old tank was measured in detail and a construction drawing true to the original was made. According to this, the sheet metal parts were cut out by laser and professionally welded. New valves and hose connections were fitted and at the end of March I received this photo on my mobile phone.
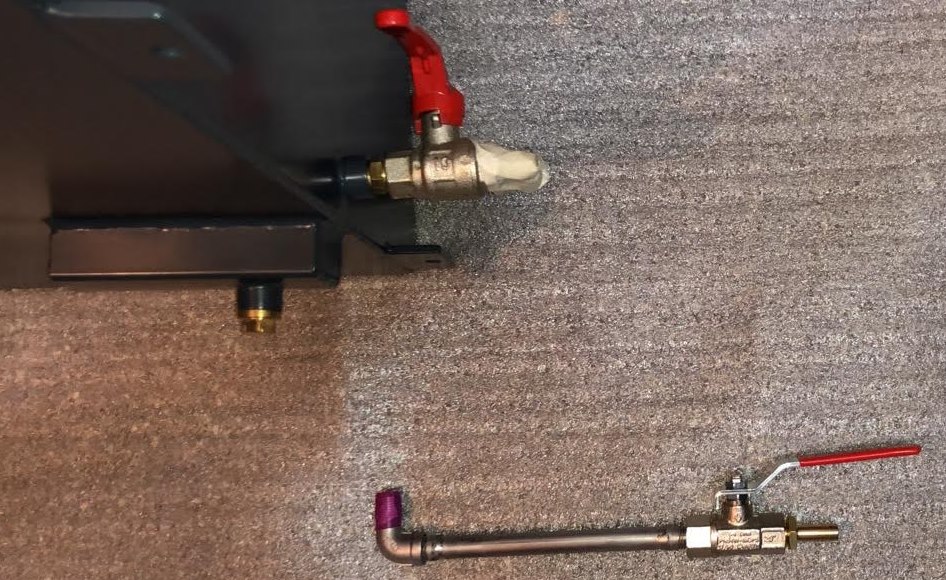
Then there was a discussion about whether the new – stainless-steel – tank should be powder-coated or not. I was against it, because no one would see anything of the device if they didn't bother to climb into the locker. Peter and his locksmith friend, on the other hand, argued that the salty sea air would dull and stain the steel, which is why it was powder-coated in “anthracite”. As an extra, I was given a pipe and valve that would make it much easier to drain the sump with the help of a larger tap.
At the beginning of the 2022 spring cruise, the new tank was picked up in Upper Austria and installed before the craning. The installation of the new diesel tank was as problem-free as the removal. The threads were sealed with silicone tape, the tabs for the fastening fitted exactly over the slightly larger drilled holes in the mounting board. The tube for the sump valve was a little too long to fit behind the reinforcement of the P-bracket of the propeller shaft. We simply turned the tube a little to the port-side and attached a piece of hose to it. It should now be no problem to drain the diesel completely through this pipe, should someone ever find it necessary to clean the sump. After assembly, we first filled in only about 10 litres of fuel to test whether all connections were tight. They are! There is, however, one difference to the original tank: we made it without the sight tube to indicate the fill level. The old one had become so cloudy anyway that you could only guess how high the diesel was in the tank, and you can estimate the consumption of the engine quite well (about 1 litre per hour in normal operation) so there is hardly any danger of suddenly being without fuel. On longer journeys, you have to carry enough spare fuel anyway, because the 67 litres would hardly be enough for longer distances. If necessary, a stick could be inserted through the tank supply line so that at least the filling height above the inlet knee can be determined.
It may be noted at this point that when Peter opened the tank after the new one was built, he found a lot of mud and sand but almost no traces of rust.
Morale?
In the end, we paid €600.00 for the tank and had a few hours of interesting work for the removal and installation. It still works, the old Austrian way of doing business: If you know someone who knows someone, then you get things done without having to bother with such annoying issues as regulations and taxes.
Otto Hollerwöger
KT653
Fin keeled Konsort pepperbird aka Periplus


